Layer and Group Images in Google Docs Easily
Google Docs has evolved from being just a word processor tool to a versatile platform that offers various features like image editing, document drawing, and more. One exciting trick you can do with Google Docs is layering and grouping images. In the past, you would have needed third-party apps for this, but now you can do it directly in Google Docs. Let's explore how.
Layer Images in Google Docs With Google Drawings
-
Open your Google Docs document and select “Insert > Drawing > New”.

-
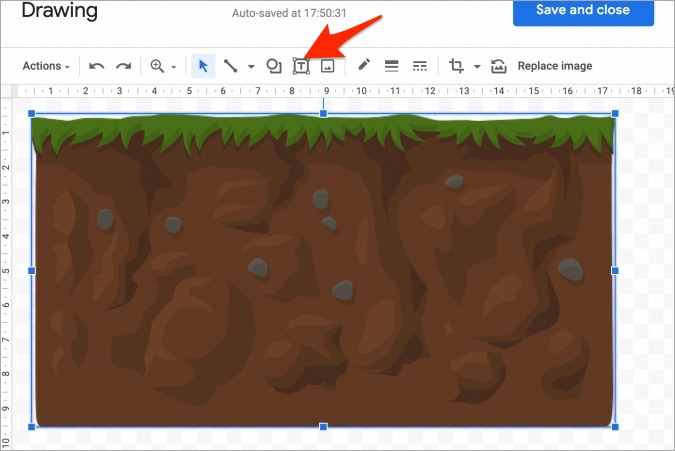
The drawing tool will open in a pop-up menu within Docs. Click on the image icon to add the base layer image on which you want to add another image or text.

-
A pop-up window will appear with various options to open the image. You can choose from Google Drive, local drive, and more. Simply find the image and open it in the Drawings app.

-
Now, you can add another image or text on top of the first image. To add an image, follow the same steps. To add text, click on the “Text box” icon and draw a text box where you want to add text. Then, format the text using the toolbar options.
-
Similarly, you can add multiple images and customize them to your liking. Once you are satisfied with the final result, click on the “Save and Close” button to add it to your Google Docs document.

Layer Images in Google Docs Using Wrap Text
-
Open your document in Google Docs and click on “Image > Insert” to select and add the first image.
-
Repeat the same step to add the second image that you want to layer on top of the first image. By default, Google Docs will place these images one below the other.
-
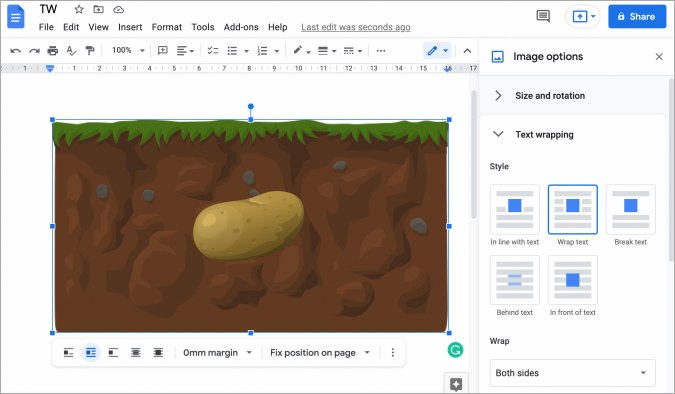
Select the first image and click on the three-dot menu icon in the toolbar. Choose “All image options”.
-
The “Image options” panel will appear in the sidebar. Select the “Wrap text” option and set the margin to 0mm (zero).
-
Repeat the same steps for the second image. Select “Wrap text” and set the margin value similarly.
-
Now, you can drag one image on top of the other and position them as desired. This method provides a quick and easy way to layer images in Google Docs.
These methods offer different levels of control and flexibility. The first method using Google Drawings gives you more options to add and format text but takes more time. The second method with wrap text is quicker and simpler, but it's best suited for layering images. Choose the method that works best for your needs.
Now you can enhance your Google Docs documents with layered and grouped images. Give it a try and make your documents more visually appealing.
Meanwhile, check out some of the best Google Docs shortcuts to make your life easier and more fun.

Jim's passion for Apple products ignited in 2007 when Steve Jobs introduced the first iPhone. This was a canon event in his life. Noticing a lack of iPad-focused content that is easy to understand even for “tech-noob”, he decided to create Tabletmonkeys in 2011.
Jim continues to share his expertise and passion for tablets, helping his audience as much as he can with his motto “One Swipe at a Time!”